How to Troubleshoot QuickBooks Desktop Display Issues?
If the display is
distorted, there is no sense of how well the application will hamper the user’s
experience. The User would face issues if they switched to a high-resolution
monitor. The QuickBooks display issues result in unwanted task delays, and it
becomes essential to resolve them as earliest as possible. This article will
discuss the symptoms and methods to fix our display issue.

What
leads to QuickBooks Desktop Display Issues?
This issue will stop
you from interacting with the QuickBooks Desktop interface. The following are
the issues that would let you figure out if the actual cause is the application
configuration or the display.
·
If the transaction form you are using to access does not fit the
screen.
·
The icon for the sizing of the objects will not appear at the
top right of the screen
·
If this issue occurs at such time, certain buttons go missing
·
Paid status is abbreviated on the Invoices
·
At the time you maximize or minimize, the screen will get
distorted
·
The homepage of your screen will show up nothing, or it will
look blank
Quick
Solutions to resolve the QuickBooks display issue
Below are the latest
methods to troubleshoot the QuickBooks desktop display issues:
Solution
1: Modify QuickBooks DPI settings
- First, right-click on the 'QuickBooks
icon' on the desktop and click on 'Properties.'
- Then click on the 'Compatibility
tab' and choose 'display scaling on higher DPI setting.'
- Click on the Apply and OK
button.
- Now Open QuickBooks and see if
the 'Display issue' is fixed.
Solution
2: Modify Desktop view preference
- In the second step, Open the
company file and go to the edit menu
- Choose 'Preferences' click
Desktop view, and then 'my preferences'
- Then Change the view from
Multiple Windows to One.
Solution
3: Modify Windows DPI settings
- Changing DPI settings is
essential as QuickBooks accounting software is designed to function with
the Windows DPI's Default settings. Therefore, if you do not use Default
values, you may face issues.
On Windows 7
- In Windows 7, right-click on
the desktop and select 'Screen.'
- Select display settings and
click make text and items more oversized.
- You can also choose the option
next to 'smaller-100%.'
- Save changes by pressing (the
CTRL+S keys) and reboot the system for the change to take effect.
Windows 8/8.1
- There is a different rule for
different windows, so now go to Right-click on Desktop and select 'Screen.'
- At the bottom of Display
settings, choose 'Make text & other items’ bigger or smaller
- Unmark allows me to choose one
scaling level for my displays.
- Drag the slider to smaller than
100% to make sure that the text and other items are of average size
- Save changes (CTRL+S keys) and
reboot the system for the change to take effect.
Windows 10
- In Windows 10, you have to
Click the 'Start’ button and go to 'Control Panel.'
- Now Press the ‘Windows +X'
keys on the keyboard.
- Choose 'Appearance and
Personalization’
- Go to 'change item size
section' and tap on 'Set custom scaling.'
- From the drop-down list, choose
100% and tap 'OK' (You can also drag the right/left to adjust the
setting)
- Tap 'Apply 'and sign out
for changes to take
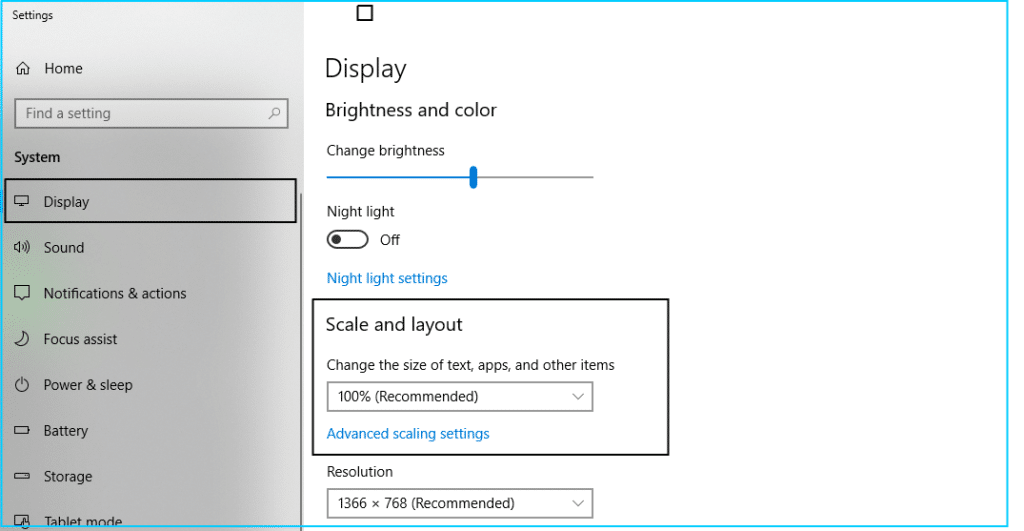
Solution
4: Modify the screen resolution setting of the computer
Windows 10:
- Hit a right-click anywhere on
the desktop (except on icons) and select the 'Display 'option
- Choose 'Display' on the
left pan and select 'Advanced display settings.’
- Done with this now, Select 'Display.'
If there is more than one display attached to your PC, then choose 'display
you need to modify.'
- Now Go to 'Resolution
section,' and click screen resolution that should be at least ‘1024
x 768 'or higher.
- Click on the 'Apply'
- Now press it for 'Keep the
changes'
Necessary: This process takes 15
seconds to keep the changes or revert before the window goes back to its
previous resolution. It's suggested to keep the screen resolution of 1920×1080.
Windows 8, 8.1 and 7
- Right-tap anywhere on the
desktop (except on icons) and select 'Display.'
- Now go for the 'Screen'
settings.
- Find out the resolution
drop-down menu and choose a 'resolution of 1024x 768 'and higher as
QuickBooks doesn't work in less than 1024×768.
- Now Choose 'OK. '
We can't deny that
QuickBooks is the best accounting tool that helps millions of users streamline
their business. However, The QuickBooks display issues will prevent you from
working efficiently. The high-resolution display issues like the graphics
display, such as screen resolution 1920*1200 or higher, will prevent you from
working efficiently. QuickBooks Desktop comprises the big and small issues
while accessing the program's screen. As we mentioned above, there are various
instances of display error. We also noted the reason for this and ways to get
out of this error in the form of a solution.
Winding Up
We have enlisted the
best solutions to help you fix QuickBooks display issues. We know how
display matters for all the functioning as if the display is not accurate, it
will directly affect your business. And we understand the importance of every
business, so we have come up with this article to help you if you face this
error on your screen.
We have a team of QuickBooks error support team who have been working for a long time to
solve your software's technical problems. So, you can reach them by dialing
helpline 1-800-615-2347 and they will surely help you.


Comments
Post a Comment