Resolve QuickBooks Error 1926 (Insufficient Permissions)

QuickBooks Error 1926 occurs when there is insufficient access to certain folders. QuickBooks safeguards your company's data, and not all users have the ability to modify files. Administrative rights are required to view certain company files. However, there may be various reasons for such interruptions.

In this article, we will guide you
through troubleshooting methods to access restricted files and folders in
QuickBooks. Additionally, this article will cover the primary causes of QuickBooks error 1926 that need to be addressed.
Causes of QuickBooks Error 1926
QuickBooks error code 1926 can be
caused by insufficient folder permissions. There could be various reasons why
you are unable to access the folders. Some factors to consider are:
●
The QB file
may be saved in a secure location, such as the program files or core of C:Drive
on a Windows PC, which can lead to issues.
●
The folder
containing the company file may have been deleted or damaged.
●
Incorrect
folder permissions can prevent access to folders or files.
●
The file may
be stored in a password-protected area.
●
These
limitations can prevent you from accessing company files. To avoid such
interruptions, QuickBooks recommends setting up the appropriate folder
permissions.
Methods to Fix QuickBooks Error
1926
Having insufficient permissions to
view a file is not a major concern for QuickBooks users. You can solve this
problem by running QuickBooks as an administrator and changing folder
permissions. Alternatively, you can create a new folder and try accessing the
file or folder from there.
Other approaches can also be tried
to fix the issue, such as relocating the QuickBooks company files to their
original location while checking folder permissions. If the permissions are not
set up correctly, count the appropriate options. If needed, you can download QuickBooks Tool Hub. To avoid any confusion and simplify the process, we will explain
each method in detail.
Method 1: Create a New Folder for Company File
To solve QuickBooks Error Code
1926, you need to create a new folder, set its permissions, and then access
the corporate file through the folder. Storing company data in a lost or
damaged folder can cause this error. Follow these steps:
●
Create a new
folder by clicking on New Folder and ensuring it's located in the same
directory as the other folders.
●
Right-click
on the company file and select Copy.
●
Go to the New
Folder and select Paste from the right-click menu.
●
Once the
company file is moved to the new directory, ensure that the folder has the
appropriate permissions to allow file sharing.
●
Launch
QuickBooks desktop and select File from the menu.
●
Choose Open
and restore a Company File.

●
Select Open a
Company File from the drop-down menu and click Next.
●
Create a new
folder in a new location and select the company file.
●
Click on
Open.
Method 2: Run QuickBooks as an Administrator
Run QuickBooks Desktop as an
administrator. Without administrative privileges, you may not be able to
perform certain tasks, such as viewing or editing company files. Here's how to
use QuickBooks with administrative privileges:
●
Close the QBs
application if it's already open on your system.
●
Right-click
on the QuickBooks software icon.
●
From the menu
bar, choose Properties.
●
On the
Compatibility tab, select Run QuickBooks as an administrator.
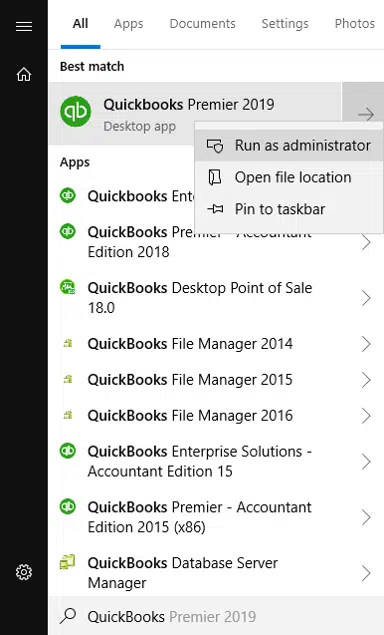
●
Click on the
Apply icon to apply the setting.
●
To complete
the process, click on the OK button.
●
By running
QuickBooks as an administrator, you can easily follow the steps in the first
method to access the folder. However, if the issue persists, check out more
methods to resolve it below.
Method 3: Use QuickBooks Tools Hub
In the next step use the
QuickBooks Tools Hub. This software is designed to provide a collection of
tools for fixing various issues in company files. Follow these steps to
download and launch QB Tools Hub on your Windows:
●
Close the
QuickBooks software and install the QB Tools Hub program.
●
Save your
file to your computer.
●
Navigate to
the Downloads folder and double-click the QuickBooksToolsHub.exe file.
●
Follow the
on-screen instructions to complete the installation process.
●
Accept the
terms and conditions of the software.
●
Finally, open
your computer and start the QB Tools Hub software.
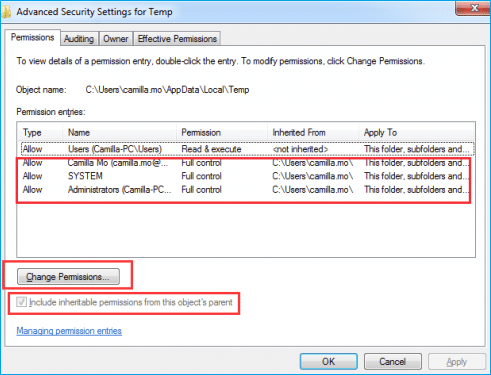
Method 4: Check Permissions in your folder
To confirm if folder permissions
have been established correctly, you can use a simple technique.
●
Open Notepad
or MS Word.
●
Type Test in
the text field and save the document in the same location where you have all
your company files.
●
If you're
able to save the file without any errors, then folder permissions have been
successfully set up.
●
Next, you
need to specify the appropriate rights for sharing QuickBooks company files.
●
On a Windows
computer, go to the Start menu and search for the folder containing your
company files.
●
Right-click
on the folder and select Properties from the drop-down menu.
●
Click on the
Share tab and then on the Share Add icon.
●
Select the
appropriate user of QuickBooks data service based on the edition you're using.
●
You can set
the authorization by clicking on the Full Control option.
●
Finally,
click on Share to apply the changes.
●
Once you've
completed these steps, you can access the file and set the necessary
permissions like folder permissions.


Comments
Post a Comment